
AWSにRails + Nginxな環境をTerraformで構築してみようと思います。
はじめに
本連載で一つずつインフラを構築していきます。
ドメインのhttps化したり、ECSを使用したコンテナオーケストレーションを用いてアプリケーションをデプロイします。
この記事ではロードバランサーの構築をします。
環境は以下です。
| OS | Cataline 10.15.6 |
| Terraform | 0.14.4 |
基本構文などこちらにまとめてますので、よかったらみてください!
AWS Terraform 基本コード まとめ
連載一覧
- terraform AWS環境構築 事前準備
- 【ネットワーク環境構築】terraform AWS環境構築 第1回
- 【ドメインhttps化・ACM(SSL)証明書発行】terraform AWS環境構築 第2回
- 【ロードバランサー構築】terraform AWS環境構築 第3回 ←ここ
- 【ECS Fargate(nginx)実行】terraform AWS環境構築 第4回
- 【RDS構築】terraform AWS環境構築 第5回
- 【Docker/ECR作成】terraform AWS環境構築 第6回
- 【ECS Fargate(rails + nginx)実行】terraform AWS環境構築 第7回
- 【CircleCIによるCI/CD】terraform AWS環境構築 番外
やること
以下の定義と作成をします。
ロードバランサー構築
elbモジュールの作成
ロードバランサーを構築するモジュールを作成します。
terraformフォルダ内にelbフォルダを作成しましょう。
elbモジュールを使用できるよう./main.tfに以下の記述を追記します。
./main.tf
module "elb" {
  source = "./elb"

  app_name = var.app_name
}
elbモジュール内でapp_nameを受け取れるように、variable.tfを用意します。
./elb/variable.tf
variable "app_name" {}
ディレクトリ構成は以下のようにしています。
[terraform] $ tree
.
├── acm
│   ├── main.tf
│   └── variable.tf
├── network
│   ├── main.tf
│   └── variable.tf
├── elb
│   └──main.tf
├── env
│   └── backend.config
├── main.tf
├── backend.tf
├── provider.tf
├── terraform.tfvars
└── variable.tf
用意できたら、terraformの初期化を行いましょう。
[terraform] $ terraform init -backend-config=env/backend.config -upgradeセキュリティーグループの作成
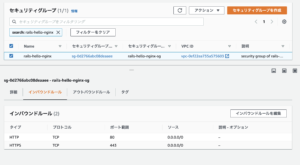
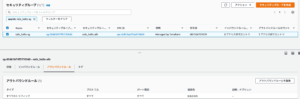
ロードバランサー用のセキュリティーグループを作成します。
セキュリティーポートのインプット変数とnetworkモジュールからvpc idを取得できるようにします。
./main.tf のelbモジュールにvpc_idを追記します。
module "elb" {
  source = "./elb"

  app_name = var.app_name
  # 追加
  vpc_id   = module.network.vpc_id
}
./elb/variable.tf に以下を追記します。
variable "vpc_id" {}

variable "ingress_ports" {
  type        = list(number)
  description = "list of ingress ports"
  default     = [80, 443]
}
./elb/main.tf に以下を追記します。
resource "aws_security_group" "security_group" {
  name = "${var.app_name}-alb"

  vpc_id = var.vpc_id

  dynamic "ingress" {
    for_each = var.ingress_ports

    iterator = port

    content {
      from_port   = port.value
      to_port     = port.value
      protocol    = "tcp"
      cidr_blocks = ["0.0.0.0/0"]
    }
  }

  egress {
    from_port   = 0
    to_port     = 0
    protocol    = "-1"
    cidr_blocks = ["0.0.0.0/0"]
  }

  tags = {
    Name = "${var.app_name}-sg"
  }
}
- name:セキュリティーグループ名
- vpc_id:紐付けるvpc id
- ingress:インバウンドルール
- from_port, to_port:ポート範囲
- protocol:プロトコル
- cidr_blocks:CIDRブロック
- egress:アウトバウンドルール
- from_port, to_port:ポート範囲
- protocol:プロトコル
- cidr_blocks:CIDRブロック
これで、セキュリティーグループの定義は完了です。
アプリケーションロードバランサーの作成
アプリケーションロードバランサーの定義をします。
ロードバランスするサブネットをnetworkモジュールから取得できるようにします。
./main.tf のelbモジュールにpublic_subnet_idsを追記します。
module "elb" {
  source = "./elb"

  app_name          = var.app_name
  vpc_id            = module.network.vpc_id
  # 追記
  public_subnet_ids = module.network.public_subnet_ids
}
./elb/variable.tf に以下を追記します。
variable "public_subnet_ids" {}
./elb/main.tf に以下を追記します。
resource "aws_lb" "alb" {
  name               = "rails-hello-alb"
  load_balancer_type = "application"

  security_groups = [aws_security_group.security_group.id]
  subnets         = var.public_subnet_ids
}
- name:ロードバランサー名
- load_balancer_type:ロードバランサーの種類
- security_groups:セキュリティーグループ
- subnets:サブネット
terraform plan, apply して作成されるか見てみましょう。
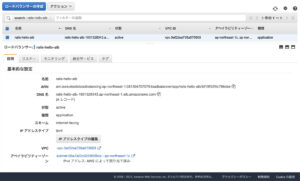
アプリケーションロードバランサーの作成は完了です。
リスナーの作成
ロードバランサーが接続できるようにリスナーを定義します。
httpsのリスナーを追加できるように前回作成したacm証明書を使用するので、acmモジュールからacm証明書のidを取得できるようにします。
./main.tf のelbモジュールにacm_idを追記します。
module "elb" {
  source = "./elb"

  app_name          = var.app_name
  vpc_id            = module.network.vpc_id
  public_subnet_ids = module.network.public_subnet_ids
  # 追記
  acm_id            = module.acm.acm_id
}
./elb/variable.tf に以下を追記します。
variable "acm_id" {}
./elb/main.tf に以下を追記します。
resource "aws_lb_listener" "http" {
  # HTTPでのアクセスを受け付ける
  port     = "80"
  protocol = "HTTP"

  load_balancer_arn = aws_lb.alb.arn

  # "ok" という固定レスポンスを設定する
  default_action {
    type = "fixed-response"

    fixed_response {
      content_type = "text/plain"
      status_code  = "200"
      message_body = "ok"
    }
  }
}

resource "aws_lb_listener" "https" {
  port     = "443"
  protocol = "HTTPS"

  load_balancer_arn = aws_lb.alb.arn
  certificate_arn   = var.acm_id

  default_action {
    type = "fixed-response"

    fixed_response {
      content_type = "text/plain"
      status_code  = "200"
      message_body = "ok"
    }
  }
}
- port:ポート番号
- protocol:プロトコル
- load_balancer_arn:紐付けるロードバランサーのarn
- certificate_arn:acm証明書のid
- default_action:アクションブロック
- type:ルーティングアクション
terraform plan, apply して作成されるか見てみましょう。
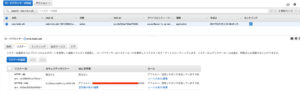
http・httpsのリスナー追加は完了です。
ロードバランサーのAレコード
Route53に登録したドメインでロードバランサーに飛ぶように、Aレコードを作成します。
ドメイン名とドメインのホストゾーンを使用します。
ドメイン名は、./main.tfのelbモジュールにdomainを追記します。
module "elb" {
  source = "./elb"

  app_name          = var.app_name
  vpc_id            = module.network.vpc_id
  public_subnet_ids = module.network.public_subnet_ids
  acm_id            = module.acm.acm_id
  # 追記
  domain            = var.domain
}
./elb/variable.tf に以下を追記します。
variable "domain" {}
ホストゾーンは、Data Sourceで取得します。
./elb/data.tf
data "aws_route53_zone" "this" {
  name         = var.domain
  private_zone = false
}
./elb/main.tf に以下を追記します。
resource "aws_route53_record" "this" {
  type    = "A"
  name    = var.domain
  zone_id = data.aws_route53_zone.this.id

  alias {
    name                   = aws_lb.alb.dns_name
    zone_id                = aws_lb.alb.zone_id
    evaluate_target_health = true
  }
}
- name:レコード名
- type:レコードタイプ
- zone_id:ホストゾーンのID
- alias:エイリアス
- name:DNS
- zone_id:ホストゾーン
- evaluate_target_health:指定されたリソースのヘルスを評価するかどうか
それでは、terraform plan, apply して確認しましょう。
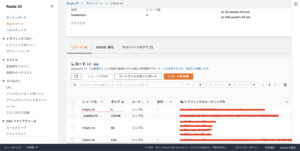
Aレコードが追加が確認できたと思います。
登録したドメインにアクセスしてokが表示されていると思います。

これで、完了です!
まとめ
ロードバランサーのリスナーはECS作成の際、リスナールールの追加を行うので、アウトプット変数を定義しておきましょう。
./elb/output.tf
output "http_listener_arn" {
  value = aws_lb_listener.http.arn
}

output "https_listener_arn" {
  value = aws_lb_listener.https.arn
}
今回、作成したコードとディレクトリ構成は以下になります。
[terraform] $ tree
.
├── elb
│   ├── data.tf
│   ├── main.tf
│   ├── output.tf
│   └── variable.tf
├── acm
│   ├── data.tf
│   ├── main.tf
│   ├── output.tf
│   └── variable.tf
├── network
│   ├── main.tf
│   ├── output.tf
│   └── variable.tf
├── env
│   └── backend.config
├── main.tf
├── output.tf
├── backend.tf
├── provider.tf
├── terraform.tfvars
└── variable.tf
./elb/main.tf
resource "aws_security_group" "security_group" {
  name = "${var.app_name}-alb"

  vpc_id = var.vpc_id

  dynamic "ingress" {
    for_each = var.ingress_ports

    iterator = port

    content {
      from_port   = port.value
      to_port     = port.value
      protocol    = "tcp"
      cidr_blocks = ["0.0.0.0/0"]
    }
  }

  egress {
    from_port   = 0
    to_port     = 0
    protocol    = "-1"
    cidr_blocks = ["0.0.0.0/0"]
  }
  tags = {
    Name = "${var.app_name}-sg"
  }
}
resource "aws_lb" "alb" {
  name               = "rails-hello-alb"
  load_balancer_type = "application"

  security_groups = [aws_security_group.security_group.id]
  subnets         = var.public_subnet_ids
}

resource "aws_lb_listener" "http" {
  # HTTPでのアクセスを受け付ける
  port     = "80"
  protocol = "HTTP"

  # ALBのarnを指定します。
  #XXX: arnはAmazon Resource Names の略で、その名の通りリソースを特定するための一意な名前(id)です。
  load_balancer_arn = aws_lb.alb.arn

  # "ok" という固定レスポンスを設定する
  default_action {
    type = "fixed-response"

    fixed_response {
      content_type = "text/plain"
      status_code  = "200"
      message_body = "ok"
    }
  }
}

resource "aws_lb_listener" "https" {
  port     = "443"
  protocol = "HTTPS"

  load_balancer_arn = aws_lb.alb.arn
  certificate_arn   = var.acm_id

  default_action {
    type = "fixed-response"

    fixed_response {
      content_type = "text/plain"
      status_code  = "200"
      message_body = "ok"
    }
  }
}
resource "aws_route53_record" "this" {
  type    = "A"
  name    = var.domain
  zone_id = data.aws_route53_zone.this.id

  alias {
    name                   = aws_lb.alb.dns_name
    zone_id                = aws_lb.alb.zone_id
    evaluate_target_health = true
  }
}
./elb/variable.tf
variable "app_name" {}

variable "vpc_id" {}

variable "ingress_ports" {
  type        = list(number)
  description = "list of ingress ports"
  default     = [80, 443]
}

variable "public_subnet_ids" {}

variable "acm_id" {}

variable "domain" {}
./elb/data.tf
data "aws_route53_zone" "this" {
  name         = var.domain
  private_zone = false
}
おわり
これで、ロードバランサーの構築は完了です。お疲れさまでした!
何か疑問に思うことがあれば、何でもコメントしてください!
次回は、NginxのみECS FargateでデプロイしてNginxが表示されるまで実装します。
参考サイト


コメント