
AWSにRails + Nginxな環境をTerraformで構築してみようと思います。
はじめに
本連載で一つずつインフラを構築していきます。
ドメインのhttps化したり、ECSを使用したコンテナオーケストレーションを用いてアプリケーションをデプロイします。
この記事ではネットワーク環境の構築を行います。
環境は以下です。
| OS | Cataline 10.15.6 |
| Terraform | 0.14.4 |
基本構文などこちらにまとめてますので、よかったらみてください!
AWS Terraform 基本コード まとめ
連載一覧
- terraform AWS環境構築 事前準備
- 【ネットワーク環境構築】terraform AWS環境構築 第1回 ←ここ
- 【ドメインhttps化・ACM(SSL)証明書発行】terraform AWS環境構築 第2回
- 【ロードバランサー構築】terraform AWS環境構築 第3回
- 【ECS Fargate(nginx)実行】terraform AWS環境構築 第4回
- 【RDS構築】terraform AWS環境構築 第5回
- 【Docker/ECR作成】terraform AWS環境構築 第6回
- 【ECS Fargate(rails + nginx)実行】terraform AWS環境構築 第7回
- 【CircleCIによるCI/CD】terraform AWS環境構築 番外
やること
以下の定義と作成をします。
ネットワーク環境構築
基本ファイル作成
インフラを構築する、基本インプット変数を定義しておきます。
./variable.tf
variable "aws_region" {
  type    = string
  default = "ap-northeast-1"
}

variable "aws_profile" {
  type        = string
  default     = "default"
  description = "AWS CLI's profile"
}

variable "app_name" {
  type    = string
  default = "rails_hello"
}

variable "domain" {}
./provider.tf
provider "aws" {
  region  = var.aws_region
  profile = var.aws_profile
}

terraform {
  required_providers {
    aws = {
      source  = "hashicorp/aws"
      version = "~> 3.27"
    }
  }
}
./terraform.tfvars
domain = "<your domain>"
./backend.tf
terraform {
  backend "s3" {}
}
networkモジュールの作成
ネットワーク環境を定義するモジュールを作成します。
terraformフォルダ内にnetworkフォルダを作成しましょう。
networkモジュールを使用できるように./main.tfに以下の記述を追記します。
module "network" {
  source = "./network"

  app_name = var.app_name
}
networkモジュール内でapp_nameを受け取れるように、variable.tfを用意します。
./network/variable.tf
variable "app_name" {}
ディレクトリ構成は以下のようにしています。
[terraform] $ tree
.
├── network
│   ├── main.tf
│   └── variable.tf
├── env
│   └── backend.config
├── main.tf
├── backend.tf
├── provider.tf
├── terraform.tfvars
└── variable.tf
用意できたら、terraformの初期化を行いましょう。
[terraform] $ terraform init -backend-config=env/backend.config -upgradeVPCの作成
まずは、vpcの定義とインプット変数を定義します。
./network/variable.tf に以下を追記します。
variable "app_name" {}

variable "vpc_cidr" {
  default = "135.0.0.0/16"
}
./network/main.tf に以下を追記します。
resource "aws_vpc" "vpc" {
  cidr_block = var.vpc_cidr

  tags = {
    Name = var.app_name
  }
}
- cidr_block:VPCのCIDRブロック
- tags:タグ
これでvpcの定義は完了です。
terraform plan, apply して作成されるか見てみましょう。
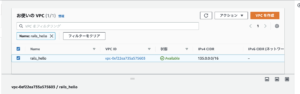
これで、vpcの作成は完了です。
パブリック・プライベートサブネットの作成
次に、パブリック・プライベートサブネットの定義とインプット変数を定義します。
./network/variable.tf に以下を追記します。
variable "public_subnet_cidrs" {
  default = ["135.0.0.0/24", "135.0.1.0/24", "135.0.2.0/24"]
}

variable "private_subnet_cidrs" {
  default = ["135.0.10.0/24", "135.0.11.0/24", "135.0.12.0/24"]
}

variable "azs_name" {
  type    = list(string)
  default = ["1a", "1c", "1d"]
}
./network/main.tf に以下を追記します。
esource "aws_subnet" "public_subnets" {
  # public_subnet_cidrs分、繰り返す
  count = length(var.public_subnet_cidrs)

 # 先程作成したvpc
  vpc_id = aws_vpc.vpc.id

  availability_zone       = var.azs[count.index]
  cidr_block              = var.public_subnet_cidrs[count.index]
  map_public_ip_on_launch = true # パブリックIP割当

  tags = {
    Name = "${var.app_name}-public-${var.azs_name[count.index]}"
  }
}

resource "aws_subnet" "private_subnets" {
  count = length(var.private_subnet_cidrs)

  vpc_id = aws_vpc.vpc.id

  availability_zone = var.azs[count.index]
  cidr_block        = var.private_subnet_cidrs[count.index]

  tags = {
    Name = "${var.app_name}-private-${var.azs_name[count.index]}"
  }
}
- vpc_id:紐付けるVPCのID
- availability_zone:サブネット配置のアベイラビリティゾーン
- cidr_block:サブネットのCIDRブロック
- map_public_ip_on_launch:当該サブネットで起動したインスタンスにパブリックIPアドレスを割り当の有無
- tags:タグ
terraform plan, apply して作成されるか見てみましょう。

これで、パブリック・プライベートサブネットの作成は完了です。
インターネットゲートウェイの作成
vpcがインターネットが接続できるように、インターネットゲートウェイの定義をします。
./terraform/main.tf に以下を追記します。
resource "aws_internet_gateway" "igw" {
  # 先程作成したvpc
  vpc_id = aws_vpc.vpc.id
  tags = {
    Name = var.app_name
  }
}
- vpc_id:紐付けるVPCのID
terraform plan, apply して作成されるか見てみましょう。

これで、「Attached」されていればインターネットゲートウェイの作成は完了です。
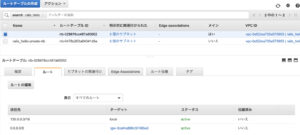
ルートテーブルの作成
通信をルートできるように、ルートテーブルの定義をします。
./terraform/main.tf に以下を追記します。
# インターネットへのルート
resource "aws_route" "public" {
  route_table_id         = aws_vpc.vpc.default_route_table_id
  destination_cidr_block = "0.0.0.0/0"
  gateway_id             = aws_internet_gateway.igw.id
}

# パブリック用のルートテーブルとパブリックサブネットの関連付け
resource "aws_route_table_association" "public" {
  count = length(var.public_subnet_cidrs)

  # *.idでサブネットIdを配列を取得
  # element()で、配列のindexのIdを取得
  subnet_id      = element(aws_subnet.public_subnets.*.id, count.index)
  route_table_id = aws_vpc.vpc.default_route_table_id
}

# プライベート用のルートテーブル作成
resource "aws_route_table" "private" {
  vpc_id = aws_vpc.vpc.id

  tags = {
    Name = "${var.app_name}-private-rtb"
  }
}

# プライベート用のルートテーブルとプライベートサブネットの関連付け
resource "aws_route_table_association" "private" {
  count = length(var.private_subnet_cidrs)

  # *.idでプライベートIdを配列を取得
  # element()で、配列のindexのIdを取得
  subnet_id      = element(aws_subnet.private_subnets.*.id, count.index)
  route_table_id = aws_route_table.private.id
}
- aws_route
- route_table_id:ルート設定するルートテーブルID
- destination_cidr_block:ルートの送信先
- gateway_id:インターネットゲートウェイのID
- aws_route_table_association
- subnet_id:紐付けるサブネットID
- route_table_id:紐付け対象のルートテーブルID
- aws_route_table
- vpc_id:VPCのID
terraform plan, apply して作成されるか見てみましょう。
パブリック用ルートテーブル
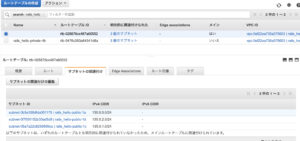
プライベート用ルートテーブル
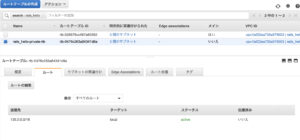
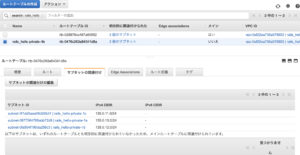
これで、ルートテーブルの定義と作成は完了です。
まとめ
vpc・サブネットのidはロードバランサー構築等で使用するので、アウトプット変数を定義しておきましょう。
./network/output.tf
output "vpc_id" {
  value = aws_vpc.vpc.id
}

output "public_subnet_ids" {
  value = aws_subnet.public_subnets.*.id
}

output "private_subnet_ids" {
  value = aws_subnet.private_subnets.*.id
}
./output.tf
output "vpc_id" {
  value = module.network.vpc_id
}

output "public_subnet_ids" {
  value = module.network.public_subnet_ids
}

output "private_subnet_ids" {
  value = module.network.private_subnet_ids
}
今回、作成したコードとディレクトリ構成は以下になります。
[terraform] $ tree
.
├── network
│   ├── main.tf
│   ├── output.tf
│   └── variable.tf
├── env
│   └── backend.config
├── main.tf
├── output.tf
├── backend.tf
├── provider.tf
├── terraform.tfvars
└── variable.tf
.network/main.tf
resource "aws_vpc" "vpc" {
  cidr_block = var.vpc_cidr

  tags = {
    Name = var.app_name
  }
}

resource "aws_subnet" "public_subnets" {
  count = length(var.public_subnet_cidrs)

  vpc_id = aws_vpc.vpc.id

  availability_zone       = var.azs[count.index]
  cidr_block              = var.public_subnet_cidrs[count.index]
  map_public_ip_on_launch = true

  tags = {
    Name = "${var.app_name}-public-${var.azs_name[count.index]}"
  }
}

resource "aws_subnet" "private_subnets" {
  count = length(var.private_subnet_cidrs)

  vpc_id = aws_vpc.vpc.id

  availability_zone = var.azs[count.index]
  cidr_block        = var.private_subnet_cidrs[count.index]

  tags = {
    Name = "${var.app_name}-private-${var.azs_name[count.index]}"
  }
}

resource "aws_internet_gateway" "igw" {
  vpc_id = aws_vpc.vpc.id

  tags = {
    Name = var.app_name
  }
}

resource "aws_route" "public" {
  route_table_id         = aws_vpc.vpc.default_route_table_id
  destination_cidr_block = "0.0.0.0/0"
  gateway_id             = aws_internet_gateway.igw.id
}

resource "aws_route_table_association" "public" {
  count = length(var.public_subnet_cidrs)

  subnet_id      = element(aws_subnet.public_subnets.*.id, count.index)
  route_table_id = aws_vpc.vpc.default_route_table_id
}

resource "aws_route_table" "private" {
  vpc_id = aws_vpc.vpc.id

  tags = {
    Name = "${var.app_name}-private-rtb"
  }
}

resource "aws_route_table_association" "private" {
  count = length(var.private_subnet_cidrs)

  subnet_id      = element(aws_subnet.private_subnets.*.id, count.index)
  route_table_id = aws_route_table.private.id
}
./network/variable.tf
variable "app_name" {}

variable "azs" {
  type    = list(string)
  default = ["ap-northeast-1a", "ap-northeast-1c", "ap-northeast-1d"]
}

variable "azs_name" {
  type    = list(string)
  default = ["1a", "1c", "1d"]
}
variable "vpc_cidr" {
  default = "135.0.0.0/16"
}
variable "public_subnet_cidrs" {
  default = ["135.0.0.0/24", "135.0.1.0/24", "135.0.2.0/24"]
}
variable "private_subnet_cidrs" {
  default = ["135.0.10.0/24", "135.0.11.0/24", "135.0.12.0/24"]
}
おわり
これで、ネットワーク環境の構築は完了しました。お疲れさまでした!
何か疑問に思うことがあれば、何でもコメントしてください!
次回は、ドメインのhttps化・ACM(SSL)証明書のリクエストを行います。
参考サイト


コメント