FlutterでFCMを使ったプッシュ通知の実装方法 (Android) を紹介します!
プッシュ通知は、アプリにとって必須な機能だと思います。
今回は、Androidのみですが今後iOSでの実装も紹介する予定です。
プッシュ通知の受信実装
今回は、タイトル通りAndroidのみの実装方法紹介です。
ただ、iOSからAndroidにプッシュ通知を送信するところまで確認できました。
環境
$ flutter doctor
[✓] Flutter (Channel stable, 1.22.2, on Mac OS X 10.15.6 19G2021, locale ja-JP)
[✓] Android toolchain - develop for Android devices (Android SDK version 28.0.3)
[✓] Xcode - develop for iOS and macOS (Xcode 12.0)
[✓] Android Studio (version 4.1)
[✓] VS Code (version 1.53.2)今回作成するFlutterプロジェクトのAndroidはkotlinを使用しています。
Step1. Androidセットアップ
まずは、Firebaseでプロジェクト作成するとき、表示される通りの手順踏んでおきましょう。
その手順に追加して、プロジェクト/android/app/build.gradleにCloud MessagingのSDKを追加しましょう。
dependencies {
    implementation "org.jetbrains.kotlin:kotlin-stdlib-jdk7:$kotlin_version"
    implementation 'com.google.firebase:firebase-messaging-ktx:21.0.1'  //追加
}
最新バージョンはこちらから→Firebase SDK
作成したFlutterプロジェクトのAndroidはkotlinを使用しているので、ktxが付いたものを追加しました。
Step2. Android バックグラウンド設定
ここで、アプリがバックグラウンドでもメッセージを受信できるようにします。
プロジェクト/android/app/src/main/kotlin/~/配下にkotlinクラスを作成していきます。
※MainActivity.ktがあるディレクトリです。
Stpe1. FirebaseCloudMessagingPluginRegistrant.ktの作成
package <パッケージ名>

import io.flutter.plugin.common.PluginRegistry
import io.flutter.plugins.firebase.messaging.FlutterFirebaseMessagingPlugin

object FirebaseCloudMessagingPluginRegistrant {
    fun registerWith(registry: PluginRegistry?) {
        if (alreadyRegisteredWith(registry)) {
            return
        }
        FlutterFirebaseMessagingPlugin.registerWith(
                registry?.registrarFor(
                        "io.flutter.plugins.firebase.messaging.FirebaseMessagingPlugin"))
    }

    private fun alreadyRegisteredWith(registry: PluginRegistry?): Boolean {
        val key: String? = FirebaseCloudMessagingPluginRegistrant::class.java.canonicalName
        if (registry?.hasPlugin(key)!!) {
            return true
        }
        registry.registrarFor(key)
        return false
    }
}
Step2. Application.ktの作成
package com.example.skype_clone

import io.flutter.app.FlutterApplication
import io.flutter.plugin.common.PluginRegistry
import io.flutter.plugin.common.PluginRegistry.PluginRegistrantCallback
import io.flutter.plugins.firebase.messaging.FlutterFirebaseMessagingBackgroundService

class Application : FlutterApplication(), PluginRegistrantCallback {

  override fun onCreate() {
    super.onCreate()
    FlutterFirebaseMessagingBackgroundService.setPluginRegistrant(this)
  }

  override fun registerWith(registry: PluginRegistry?) {
    FirebaseCloudMessagingPluginRegistrant.registerWith(registry)
  }
}
Step3. AndroidManifest.xmlの変更
作成した、FirebaseCloudMessagingPluginRegistrant.kt・Application.ktを読み込ませます。
<manifest xmlns:android="http://schemas.android.com/apk/res/android"
    package="プロジェクト名">
    <!-- io.flutter.app.FlutterApplication is an android.app.Application that
         calls FlutterMain.startInitialization(this); in its onCreate method.
         In most cases you can leave this as-is, but you if you want to provide
         additional functionality it is fine to subclass or reimplement
         FlutterApplication and put your custom class here. -->
    <application
        android:name=".Application"  ##編集
     android:label="プロジェクト名"
        android:icon="@mipmap/ic_launcher">
上記のように、<application android:name = “.Application” …> のように変更しましょう。
https://firebase.flutter.dev/docs/messaging/overview/
ここのサイトによると、FirebaseCloudMessagingPluginRegistrant.ktは要らなのかも、、
Step3. Flutterの設定
ここから、Flutterの設定をしていきます。
Step1. プラグインのインストール
firebase_coreのバージョンの兼ね合いでfirebase_messaging: ^8.0.0-dev.14をインストールしています。
pubspec.yamlに以下の追記します。
dependencies:
  flutter:
    sdk: flutter

  firebase_core: ^0.7.0
  firebase_messaging: ^8.0.0-dev.14
  flutter_local_notifications: ^4.0.1+1
Step2. main.dart
基本、ここのexampleに書かれているように実装すれば大丈夫です。
https://pub.dev/packages/firebase_messaging/versions/8.0.0-dev.14
全文
import 'package:flutter/material.dart';
import 'package:firebase_core/firebase_core.dart';
import 'package:firebase_messaging/firebase_messaging.dart';
import 'package:flutter_local_notifications/flutter_local_notifications.dart';

Future<void> _firebaseMessagingBackgroundHandler(RemoteMessage message) async {
  await Firebase.initializeApp();
  print("Handling a background message ${message.messageId}");
}

/// Create a [AndroidNotificationChannel] for heads up notifications
const AndroidNotificationChannel channel = AndroidNotificationChannel(
  'high_importance_channel', // id
  'High Importance Notifications', // title
  'This channel is used for important notifications.', // description
  importance: Importance.high,
  enableVibration: true,
  playSound: true,
);

/// Initalize the [FlutterLocalNotificationsPlugin] package.
final FlutterLocalNotificationsPlugin flutterLocalNotificationsPlugin =
    FlutterLocalNotificationsPlugin();

void main() async {
  WidgetsFlutterBinding.ensureInitialized();
  await Firebase.initializeApp();

  // Set the background messaging handler early on, as a named top-level function
  FirebaseMessaging.onBackgroundMessage(_firebaseMessagingBackgroundHandler);

  await flutterLocalNotificationsPlugin
      .resolvePlatformSpecificImplementation<
          AndroidFlutterLocalNotificationsPlugin>()
      ?.createNotificationChannel(channel);

  await FirebaseMessaging.instance.setForegroundNotificationPresentationOptions(
    alert: true,
    badge: true,
    sound: true,
  );

  await DotEnv.load(fileName: '.env');

  runApp(MyApp());
}

class MyApp extends StatefulWidget {
  @override
  _MyAppState createState() => _MyAppState();
}

class _MyAppState extends State<MyApp> {
  AuthMethods _authMethods = AuthMethods();

  @override
  void initState() {
    FirebaseMessaging.onMessage.listen((RemoteMessage message) {
      RemoteNotification notification = message.notification;
      AndroidNotification android = message.notification?.android;

      if (notification != null && android != null) {
        flutterLocalNotificationsPlugin.show(
          notification.hashCode,
          notification.title,
          notification.body,
          NotificationDetails(
            android: AndroidNotificationDetails(
              channel.id,
              channel.name,
              channel.description,
              // TODO add a proper drawable resource to android, for now using
              //      one that already exists in example app.
              icon: 'launch_background',
            ),
          ),
        );
      }
    });

    String token = await FirebaseMessaging.instance.getToken();
    print('token: $token');
    super.initState();
  }

  @override
  Widget build(BuildContext context) {
    return MaterialApp(
      title: 'Push Notification',
      theme: ThemeData(
        primarySwatch: Colors.blue,
      ),
      home: PushNotification(),
    );
  }
}

class PushNotification extends StatefulWidget {
  @override
  _PushNotificationState createState() => _PushNotificationState();
}

class _PushNotificationState extends State<PushNotification> {
  @override
  void initState() {
    FirebaseMessaging.instance
        .getInitialMessage()
        .then((RemoteMessage message) async {
      print(message);
    });

    FirebaseMessaging.onMessageOpenedApp.listen((RemoteMessage message) async {
      print('A new onMessageOpenedApp event was published!');
      print(message);
    });
    super.initState();
  }

  @override
  Widget build(BuildContext context) {
    return Scaffold(
      appBar: AppBar(
        title: Text('push notification'),
      ),
      body: Center(
        child: Container(
          child: Text('プッシュ通知'),
        ),
      ),
    );
  }
}
アプリ起動
$ flutter run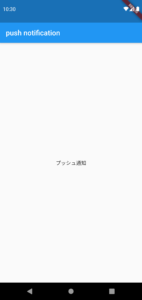
起動できれば一旦flutterの設定は完了です。
Step4. Firebase Cloud Messagingで通知作成
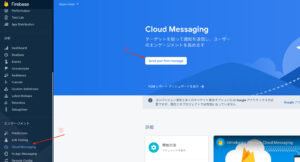
Cloud Messagingで通知作成準備
FirebaseのCloud MessagingからSend your first messageを選択して通知を作成しましょう。
通知作成
タイトルとメッセージ内容を設定したら テスト メーメッセージを送信を選択をします。
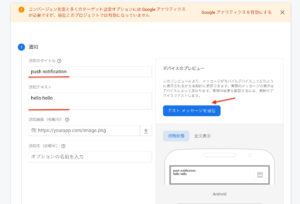
FCMトークン登録
FCM 登録トークン追加にデバイストークンを登録しましょう。
このトークンはメッセージ送信の宛先になります。
取得コードはこちら!
String token = await FirebaseMessaging.instance.getToken();
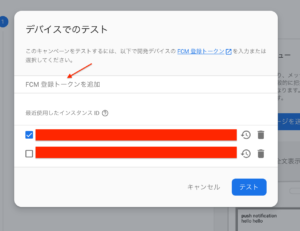
追加したら右下のテストを押して送信して届くか見てみましょう。
通知受信
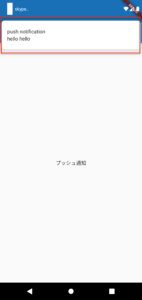
画像のように通知が表示されれば完了です!
バックグラウンドで通知受信
アプリがバックグランドでも通知を受信をできるか見みましょう。
先程同様に通知を送信しましょう。
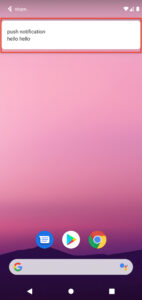
画像のように通知が表示されれば完了です!
通知をタップして任意の画面を開く
通知をタップして任意の画面(ex. メッセージ表示画面)に遷移するようにしてましょう。
下記のコードのようにmain.dartを修正
...

class PushNotification extends StatefulWidget {
  @override
  _PushNotificationState createState() => _PushNotificationState();
}

class _PushNotificationState extends State<PushNotification> {
  @override
  void initState() {
    FirebaseMessaging.instance
        .getInitialMessage()
        .then((RemoteMessage message) async {
      if (message != null) {
        print(message);
        Navigator.push(
          context,
          MaterialPageRoute(
            builder: (context) => MessagePage(message: message),
          ),
        );
      }
    });

    FirebaseMessaging.onMessageOpenedApp.listen((RemoteMessage message) async {
      print('A new onMessageOpenedApp event was published!');
      print(message);
      Navigator.push(
        context,
        MaterialPageRoute(
          builder: (context) => MessagePage(message: message),
        ),
      );
    });
    super.initState();
  }

  @override
  Widget build(BuildContext context) {
    return Scaffold(
      appBar: AppBar(
        title: Text('push notification'),
      ),
      body: Center(
        child: Container(
          child: Text('プッシュ通知'),
        ),
      ),
    );
  }
}

class MessagePage extends StatelessWidget {
  final RemoteMessage message;

  MessagePage({this.message});

  @override
  Widget build(BuildContext context) {
    return Scaffold(
      appBar: AppBar(
        title: Text('tap notification'),
      ),
      body: Center(
        child: Container(
          child: Column(
            mainAxisAlignment: MainAxisAlignment.center,
            children: [
              Text('title: ${message.notification.title}'),
              Text('body: ${message.notification.body}'),
            ],
          ),
        ),
      ),
    );
  }
}
修正できたら起動しましょう。
下記のような動きになれば完了です!
プッシュ通知の送信方法
送信方法はそんなに難しくなく、fcm サーバー?にPOSTリクエストを送ればOKです。
コードはこちら
import 'package:http/http.dart' as http;

sendNotification(){
  try {
      http.post(
        'https://fcm.googleapis.com/fcm/send',
        headers: <String, String>{
          'Content-Type': 'application/json; charset=UTF-8',
          'Authorization': 'key=$serverKey',
        },
        body: jsonEncode({
          'to': $recieverToken,
          'priority': 'high',
          'notification': {
            'title': 'push',
            'body': 'ぷっしゅ通知',
          }
        }),
      );
    } catch (e) {
      print(e);
    }
}
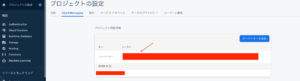
$serverKey にはプロジェクトのサーバーキー、
$receiverToken には受信者となるデバイスのトークンを設定してください。
サーバーキーはプロジェクト設定のCloud Messagingから確認できます。
これで、sendNotification()を実行すれば送信れます!
おわり
以上でAndroidでのプッシュ通知の受信は完了です。
お疲れさまでした!
Flutterでプッシュ通知を実装しようとして調べてもプラグイン等がアップデートしているものが多く、古めの情報になってしまいとても苦労しました。(;´Д`)
2021年から実装される方々にとって役に立ってくれればとても嬉しいです!


コメント